Squealing e-bike disc brakes are usually caused by pad rub, contamination, worn pads or a rotor that is slightly out of line. The trick is to diagnose the noise before turning bolts, because the wrong fix can make a heavy e-bike less safe rather than quieter.
In This Article
- First Check: Is It Safe to Ride?
- Diagnose the Noise Before Touching the Bolts
- Tools, Parts and UK Prices
- Adjust E-Bike Disc Brakes: Mechanical Systems
- Align Hydraulic Disc Brakes
- Clean, Replace and Bed In Pads Properly
- Test the Brake and Know When to Use a Shop
- Frequently Asked Questions
First Check: Is It Safe to Ride?
Before you adjust e-bike disc brakes to stop squealing, check whether the bike is safe to ride at all. Noise is annoying; weak braking is a stop-now problem. E-bikes are heavier than ordinary bikes, and that extra weight makes poor brakes feel worse on hills, in traffic and with panniers or a child seat fitted.
Do not ride the bike if any of these apply:
- The brake lever pulls to the handlebar: cable tension may be gone, hydraulic fluid may be low, or the pads may be badly worn.
- The wheel does not slow firmly: noise is no longer the main issue; braking power is.
- There is oil around the caliper: hydraulic leakage can contaminate pads and needs proper repair.
- The rotor is deeply scored, cracked or blue from heat: replace it rather than trying to tune around damage.
- The brake pulses hard once per wheel revolution: the rotor may be bent or loose.
Transport for London’s e-bike safety advice is blunt on this point: converted and purpose-built e-bikes need adequate, well-adjusted brakes to handle the extra weight and speed safely. That is the right way to think about this job. Quiet is nice. Safe comes first.
If the bike passes that basic safety check, the next step is to work out which kind of noise you have. A light scrape every wheel revolution is a different problem from a loud honk under braking.
Diagnose the Noise Before Touching the Bolts
Disc brakes make three common noises: rubbing, squealing and grinding. Each points to a different fix.
Light Rotor Rub
Rotor rub sounds like a faint shhh-shhh-shhh as the wheel spins. It often happens after removing and refitting a wheel, knocking the bike in a hallway, carrying it on a car rack, or squeezing the brake lever while the wheel was out.
For e-bikes with heavier wheels, check the wheel is fully seated before blaming the brake. A rear hub motor wheel that is even slightly mis-seated can make the rotor run off-centre through the caliper. Open the quick release or axle nuts, settle the wheel properly into the dropout, tighten it to the manufacturer’s spec, then spin again.
High-Pitched Squeal Under Braking
A sharp squeal when you pull the lever is usually contamination, glazed pads, wet rotors or pads that were never bedded in. Commuter e-bikes are prone to this because they live near road spray, chain lube, kitchen-hallway dust and rushed maintenance.
If you recently sprayed lubricant anywhere near the bike, assume contamination until proved otherwise. Disc brake pads are tiny sponges for oily mistakes. Ask me how I know.
Grinding or Scraping
Grinding is more serious. It can mean pads have worn through, a spring clip is touching the rotor, or the rotor is badly scored. Stop and inspect pad thickness before riding again. That is exactly the practical check that saves rotors.
One-Sided Rub
If the rotor runs close to one pad for the whole revolution, the caliper is misaligned. If it only rubs at one point, the rotor is likely bent. Do not keep winding adjusters in to hide a bent rotor; you will just make lever feel worse and pad clearance tighter.
Tools, Parts and UK Prices
You do not need a workshop wall of tools for a basic disc brake adjustment. You do need clean hands, the right Allen key and enough patience not to contaminate the pads.
For a home e-bike brake job, I would keep this kit:
- Allen keys: a decent metric set is usually £8-£15 from Halfords, Decathlon or Amazon UK.
- Torque wrench: useful for caliper bolts and e-bike axles; basic bike torque wrenches start around £35-£45.
- Disc brake cleaner: Muc-Off Disc Brake Cleaner is about £10.99 for 750ml at Tredz or around £8-£12 for smaller cans from bike shops.
- Clean lint-free cloth: microfibre cloths are about £3-£6 for a pack, but keep one only for brakes.
- Replacement pads: Decathlon-compatible Shimano-style pads start around £6.99, Shimano B05S resin pads are about £5.99-£8.99 at Tredz, and finned Shimano road pads can be about £15.99-£17.99.
- Rotor: basic 160mm or 180mm rotors are often £10-£25; branded e-bike-suitable rotors can be more.
- Bike shop service: Halfords lists fuller bike servicing from £95, while local shops often charge less for a single brake adjustment or pad swap.
Check pad shape before buying. Halfords’ brake guide notes that disc brake pads are specific to the caliper type rather than interchangeable. A Shimano B05S-style pad will not fit every Shimano caliper, never mind Tektro, SRAM, Magura or Zoom. Take the old pad to a shop if you are unsure.
This is also a good time to check your broader service rhythm. Our e-bike maintenance schedule covers the boring but useful pattern: tyres, chain, bolts, brake pads and battery contacts. Brakes should not be a once-a-year surprise.
Adjust E-Bike Disc Brakes: Mechanical Systems
Mechanical disc brakes use a cable. You pull the lever, the cable moves an arm on the caliper, and one or both pads move towards the rotor. They are common on cheaper e-bikes and some folding models because they are simple and easy to service.
The downside is that they need occasional cable and pad adjustment. As pads wear, the lever comes closer to the bar and the brake can feel weak even when nothing is broken.
Step 1: Check the Wheel and Rotor
Spin the wheel and watch the rotor through the caliper. If the rotor wobbles side to side once per turn, you have a rotor issue. If the rotor sits consistently too close to one pad, the caliper needs alignment.
Make sure the axle is tight first. On rear hub motor e-bikes, an axle that is not fully seated can cause more brake rub than a badly aligned caliper.
Step 2: Back Off Cable Tension Slightly
If the brake is dragging, turn the barrel adjuster clockwise to reduce cable tension. Barrel adjusters are usually at the lever or caliper. Do this in small turns. If nothing changes, the caliper may need moving rather than cable tension.
If the lever pulls too far before the brake bites, turn the barrel adjuster anti-clockwise to add tension. Leave enough free movement that the pads are not permanently brushing the rotor.
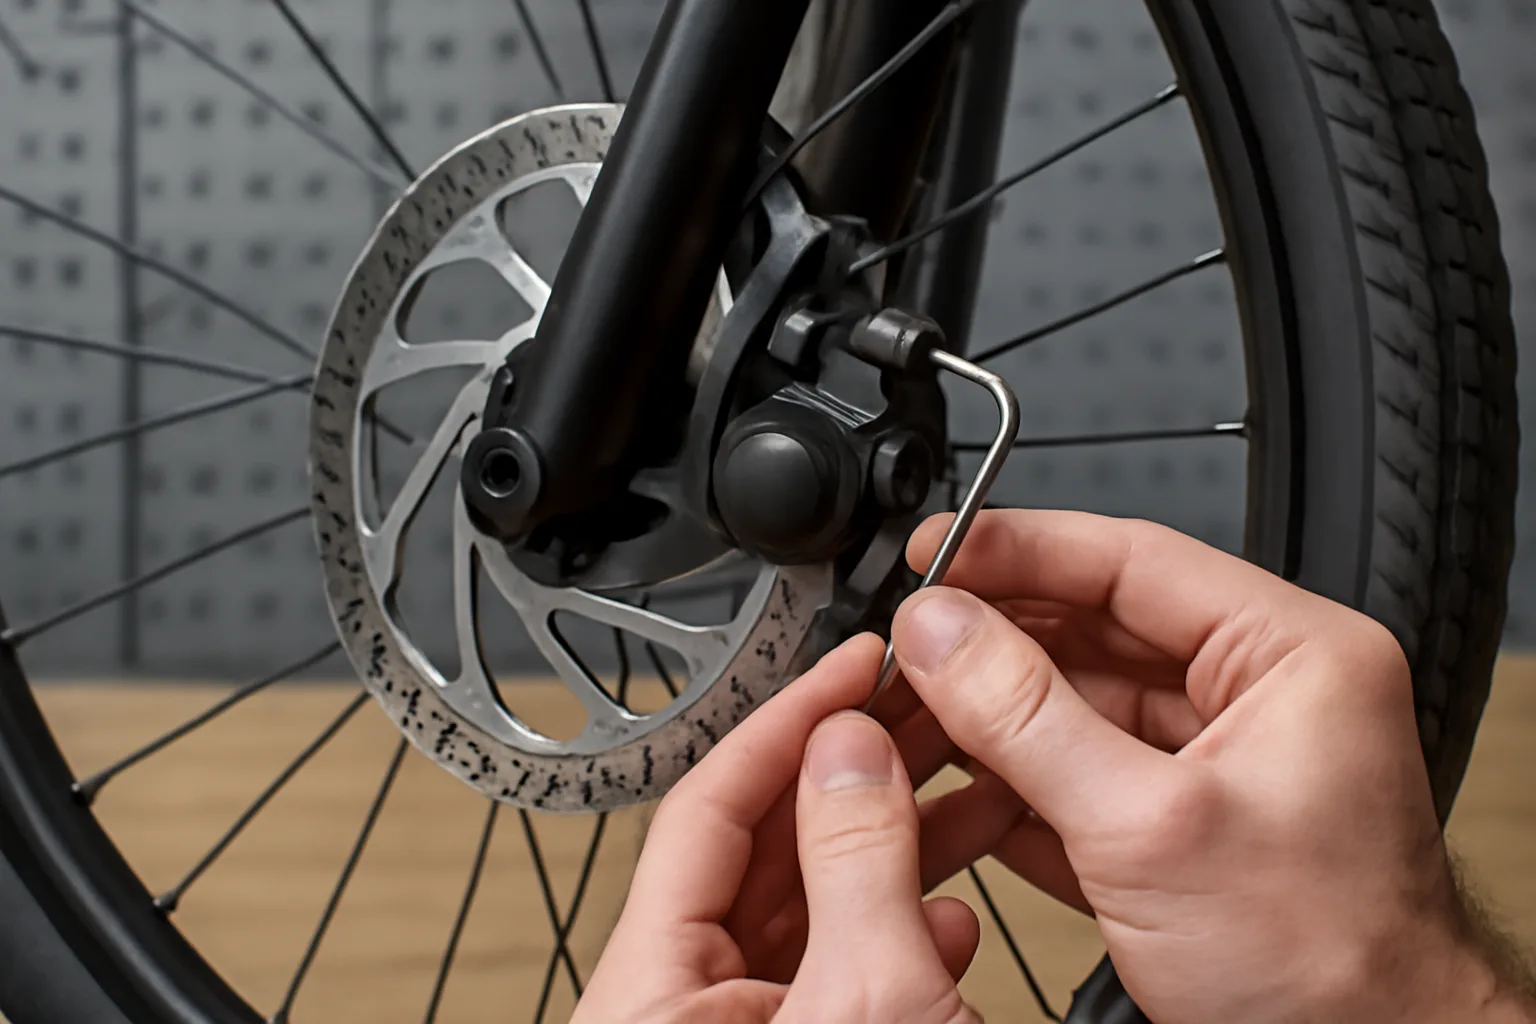
Step 3: Centre the Caliper
Use the correct Allen key to loosen the two caliper mounting bolts just enough that the caliper can move. Do not remove them.
- Loosen both caliper bolts: the caliper should shift by hand but not flop around.
- Squeeze the brake lever: this clamps the pads onto the rotor and roughly centres the caliper.
- Hold the lever: keep pressure on while tightening the bolts evenly.
- Release and spin: listen for rub and look through the caliper gap.
- Fine-tune by eye: if one side still rubs, loosen and nudge the caliper a fraction towards the opposite side.
That lever-squeeze trick often works, but not always. Some mechanical calipers move only one pad, so you may need to use the fixed-pad adjuster as well.
Step 4: Set the Fixed Pad
Many mechanical calipers have an inner pad adjuster, often turned with an Allen key. Move the fixed pad close to the rotor without touching. Then use cable tension to bring the moving pad in. The goal is a firm lever and a rotor running freely through the gap.
If you keep adding cable tension to compensate for a fixed pad that is miles away, the brake will feel wooden and weak. Set pad position first, cable second.
Align Hydraulic Disc Brakes
Hydraulic disc brakes use fluid rather than a cable. They usually self-adjust as pads wear, which is why many mid-range and premium e-bikes use them. They still rub when the caliper is off-centre, pistons are sticky, or the rotor is slightly bent.
Park Tool’s hydraulic disc brake alignment guide describes pad and rotor rub as the main symptom of a misaligned caliper, while also noting that an improperly seated wheel can cause similar symptoms. That distinction matters on e-bikes, because heavy wheels make seating mistakes more common.
Step 1: Reseat the Wheel
Put the bike in a stand if you have one. If not, ask someone to hold it steady. Reseat the wheel properly before touching caliper bolts. For quick-release wheels, close the lever firmly. For thru-axles or hub motor axle nuts, tighten to the bike maker’s recommendation.
Spin the wheel again. If the rub has gone, you have fixed the actual problem. No bolt-twiddling required.
Step 2: Centre the Caliper
Loosen the caliper mounting bolts a quarter to half a turn. Pull the brake lever firmly and hold it. Tighten the bolts evenly while still holding the lever. Release and spin the wheel.
If the rotor still rubs, align by eye. Look through the caliper from behind or above and aim for equal daylight either side of the rotor. Move the caliper in tiny amounts. A millimetre is too much; think paper-thin nudges.
Step 3: Reset Sticky Pistons
If one pad sits much closer than the other even after centring, a piston may be sticky. Remove the wheel and pads, insert a clean plastic tyre lever or piston press, and gently push the pistons back. Do not use a screwdriver against the pad surface.
Keep oil, degreaser and chain lube away from the open caliper. If you are not comfortable removing pads, this is a reasonable local-bike-shop job. Hydraulic brakes are not hard, but they punish clumsy cleaning.
Step 4: Check Lever Feel
After alignment, the lever should feel firm and consistent. If it feels spongy, pulls close to the bar, or changes bite point during a ride, the brake may need bleeding. That is a shop job for most riders unless you already own the correct bleed kit and fluid. Shimano mineral oil and SRAM DOT fluid systems are not interchangeable, and mixing them is an expensive mistake.
Clean, Replace and Bed In Pads Properly
If the brake squeals only when you pull the lever, alignment may not fix it. Contaminated or glazed pads can be perfectly centred and still sound awful.
Clean the Rotor
Spray disc brake cleaner onto a clean cloth and wipe the rotor braking surface. Do not spray wildly across the whole bike. Keep cleaner away from tyres, painted surfaces and bearings where possible.
Rotate the wheel and clean both sides of the rotor. Use a fresh part of the cloth as it gets dirty. If the cloth comes away black, keep going until it comes away cleaner.
If you clean e-bikes after muddy rides, be careful around brakes. Our muddy e-MTB cleaning guide covers the broader wash process, but brakes deserve their own cloth and no oily finishing spray.
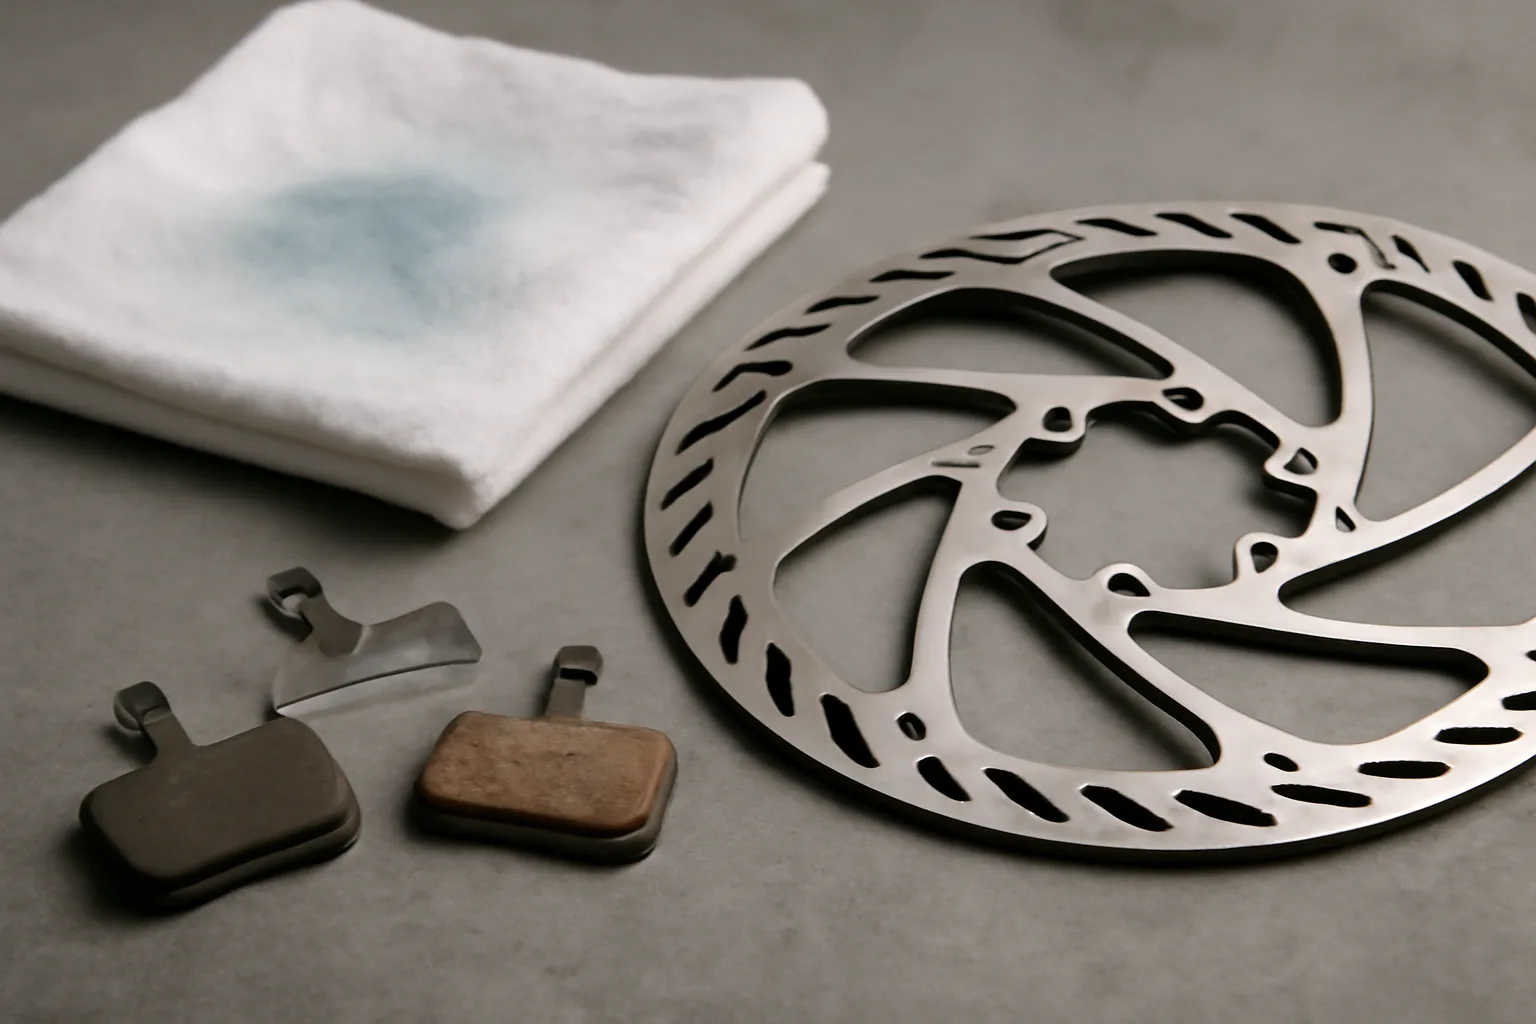
Inspect Pad Thickness
Remove the pads if you can do it confidently. If there is less than about 1mm of friction material left, replace them. If the pads look shiny, blackened or oily, replacement is often better than sanding and hoping.
For everyday UK commuting, resin pads are quieter and bite well from cold. Sintered or metallic pads last longer in wet, gritty conditions but can be noisier. If your e-bike is heavy, used on hills, or used for cargo, I would lean towards quality branded pads rather than the cheapest unbranded pair online.
Replace Pads Without Contaminating Them
Wash your hands or wear clean gloves. Keep new pads away from chain lube, greasy tools and dirty rags. Fit the spring clip correctly, secure the retaining pin or bolt, then spin the wheel before riding.
If the rotor was badly contaminated, new pads on a dirty rotor will quickly become noisy too. Clean the rotor before fitting the pads.
Bed In the Pads
New pads need bedding in. Find a quiet, flat road or car park. Accelerate to a moderate speed, brake firmly down to walking pace, then release. Repeat 10-20 times. Do not come to a full stop with the brake clamped hard every time; you want to transfer an even layer of pad material to the rotor.
After bedding in, the brake should feel stronger and quieter. If it squeals again immediately, suspect rotor contamination, a leaking caliper or the wrong pad compound.
Test the Brake and Know When to Use a Shop
Once the brake is aligned, cleaned or fitted with new pads, test it properly before riding in traffic.
Start with a static test:
- Lever feel: firm, not pulling to the handlebar.
- Wheel spin: no constant rub, or only the faintest occasional whisper from a slightly imperfect rotor.
- Axle security: quick release, thru-axle or hub motor nuts tight.
- Caliper bolts: tightened evenly, not left finger-tight after adjustment.
- Pad retention: retaining pin, clip or bolt correctly refitted.
Then do a slow test ride away from traffic. Brake gently, then harder. Try both brakes separately and together. An e-bike should stop predictably without grabbing, fading, pulsing hard or pulling to one side.
Use a shop if:
- The lever feels spongy: hydraulic brakes may need bleeding.
- There is fluid around the caliper: pads and seals need proper inspection.
- The rotor is bent: minor truing is possible, but replacement is often cleaner.
- The brake still squeals with new pads and clean rotor: there may be a caliper leak or incompatible pad/rotor mix.
- You carry children or heavy cargo: do not gamble with marginal braking.
This also ties into legal and practical e-bike setup. Our UK e-bike laws guide covers speed and power limits, but a legal e-bike still needs to be mechanically sound. Brakes, tyres and lights are the things that matter on a wet Tuesday commute, especially if you are following the habits in our safe traffic riding guide.
If your brake problem appeared after adding weight, look at the whole bike. Heavy panniers, child seats and cargo loads ask more of tyres and brakes. Our e-bike tyre guide is worth pairing with this job if the bike is used year-round.
One final opinion: if the bike is your daily transport, pay for a shop repair sooner than you would on a pub bike. A £20-£40 brake adjustment at a local shop is cheap compared with missing work, damaging a rotor, or discovering on a hill that your “probably fine” brake is not fine.
Frequently Asked Questions
Why do my e-bike disc brakes squeal? The most common causes are contaminated pads, dirty rotors, glazed pads, wet braking surfaces, poor bedding-in or a caliper that is not aligned with the rotor. A grinding sound usually points to pad wear or rotor damage.
Can I adjust e-bike disc brakes myself? You can handle simple caliper alignment, rotor cleaning and pad replacement if you are careful and have the right tools. Stop and use a bike shop if the lever feels spongy, there is hydraulic fluid near the caliper, or braking power is weak.
How much do replacement e-bike brake pads cost in the UK? Basic compatible disc pads start around £6.99 at Decathlon. Shimano B05S resin pads are often about £5.99-£8.99 at Tredz, while higher-end finned or metallic pads can be about £15-£25.
Should e-bike disc brakes rub slightly? A tiny occasional whisper from a slightly imperfect rotor is common, but constant rubbing needs attention. Check the wheel is seated correctly, then centre the caliper. If rub happens at one point only, the rotor may be bent.
Do hydraulic e-bike brakes need adjusting? Hydraulic brakes self-adjust for pad wear, but the caliper can still need aligning and sticky pistons can need resetting. If the lever feels soft or pulls too close to the bar, the system may need bleeding.
Is brake squeal dangerous? Noise alone is not always dangerous, but weak braking, grinding, fluid leaks or a lever that pulls to the bar are serious. Because e-bikes are heavier than ordinary bikes, treat brake problems early rather than riding through them.